


visionOS - From Zero to Hero - #2
#visionos #visionpro #apple #game #tutorial

I started iOS programming in 2007 and Objective-C even longer before in 1990 while working on a NeXT Cube. It is unbelievable that I have the opportunity, more than 30 years later, to work on a spatial computing device using many of the same tools and frameworks. Of course, a lot has changed since then, and while I have already focused on Spatial Computing for the last six years, it’s cool to get my hands on a Vision Pro now. But let’s start; in the end, it’s not about my personal history but about Apple making the next step!
What’s the goal?
The Apple Vision Pro (AVP) uses many of the same technologies as your iPhone and iPad. Still, it does that slightly differently now … For those who have already worked with ARKit and before SceneKit, it will probably be straightforward to follow this newsletter. Still, no worries. I will also cover some basics here and there. At that point, it’s my goal that every developer has all the information needed to write his apps or games. We start with straightforward ones. But make it step by step to something worth uploading to the AppStore ;)
The first Game
Create the Game Skeleton
Since I will use SwiftUI for the user interface in the game, let’s start with the app and the basic windows we need. When you choose a visionOS project template, it already comes with some predefined classes, but we start more straightforwardly and add all we need step by step so you understand the meaning of all elements.
import SwiftUI

@main
struct GameApp: App {
    var body: some Scene {
        WindowGroup(id: "main_window") {
            MainMenuView()
        }

        ImmersiveSpace(id: "game_space") {
            ImmersiveGameSpace()
        }
        .immersionStyle(selection: .constant(.mixed), in: .mixed)
    }
}
That’s super simple. But it’s all that is needed to start. As you see, I use a window with the id main_window and an immersive space with the id game_space. Both elements we will create now
import SwiftUI

struct MainWindow: View {
    var body: some View {
        VStack {
            Text("visionOS - FROM ZERO TO HERO")
                .font(.system(size: 38))

            Button(action: {
               // ... action comes here
            }) {
                Text("START")
            }
            .padding()
            .buttonStyle(.bordered)
        }
        .padding()
    }
}
This is the window we want to show when you start the app. Starting directly in the immersive space is also possible, but I will keep that structure for now. This SwiftUI window would work on any other Apple device, so let’s start ASAP with the immersive space.
import SwiftUI
import RealityKit
import RealityKitContent

struct GameSpace: View {
    var body: some View {
        RealityView { content in
           // ... content comes here
        }
    }
}
With those three Swift structs, you already have the essential elements of a visionOS app skeleton. But when you start, you will see that you can almost do nothing and only see the first window.
Important to know: The app always opens the first defined window at startup. Since we have only one, it is, in our case, main_window.
You can see the complete skeleton code here. It’s also a good and minimalistic starting point for your projects.
App Navigation: Windows and Spaces

Before I add the game elements to the immersive space, I want to show you how you create a flow between windows and spaces. In the XCode example, the app toggles the immersive space on and off, but that’s not what we want in a real game. Instead, we open and close windows and spaces in our game as needed:
The App opens the main window by default
When we press “Start,” the immersive space will be opened, the game window will be opened, and the main window will be closed.
When we finish the game, we close the space again and open the window (we create that later)
To open and dismiss (close) a window, the following calls are used:
openWindow(id: "main_window")
dismissWindow(id: "main_window")
But to use these calls in SwiftUI, we must also declare it first like this:
@Environment(\.openWindow) var openWindow
@Environment(\.dismissWindow) var dismissWindow
For spaces, we have to do something similar, which looks like this:
@Environment(\.openImmersiveSpace) var openImmersiveSpace
@Environment(\.dismissImmersiveSpace) var dismissImmersiveSpace

await openImmersiveSpace(id: "game_space")
await dismissImmersiveSpace()
That’s it. All we need to do is implement a nice screen flow. If you are wondering why that is needed, here are more details from the Apple Documentation.
You can see the entire workflow and how this is done in the code here.
RealityKit
ModelEntity
RealityKit uses Entities and ModelEntities as game objects. RealityKit uses a component-based approach to add a few available components to an entity. And, of course, you can also create your components. But more on approach this later. Game
I always suggest using primitives instead of assets until you have found a game mechanic that has to be proven fun. It’s easy to implement and for free. Also, it can be done purely programmatically and easily changed in code afterward. I usually use boxes in different colors.
Entity Component System (ECS)
Using Sytems and Entities is the best approach to implementing a “Game engine” in RealityKit. You can use it to define and apply logic for entities in a scene. Systems are beneficial for implementing behavior that affects multiple entities in your scene. In a traditional object-oriented approach, you implement an entity’s behavior by writing code on the entity class, which runs on every class instance on every frame. That approach can be inefficient if there are many entities in your scene. However, we first learn the “traditional” approach, which can be used on every platform. But no worries, we will refactor our code later in the series to use ECS.
Game Engine
I usually pack the entire Game and its game logic into its class, wholly separated from the user interface and immersive space. This allows you to change the user interface anytime and have one class responsible for handling everything. But more on that later when the game gets more complex.
Game Logic
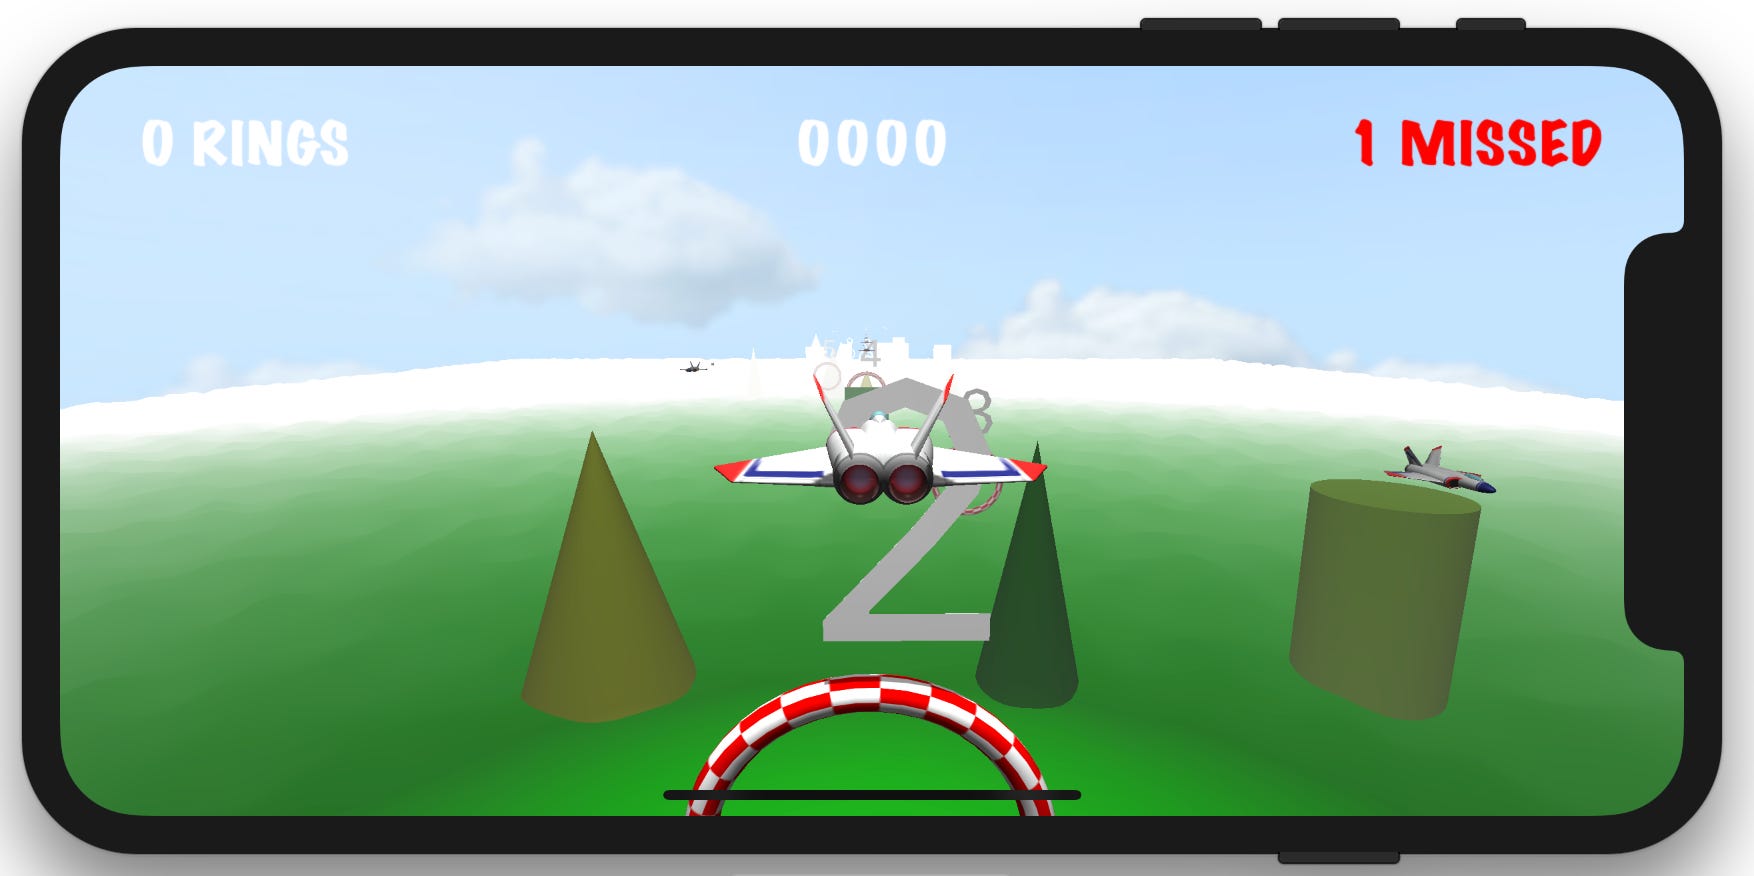
The most important of a game is probably the game logic—the code we need to implement the game mechanics. At first, we do something straightforward. It will be a visionOS version of the game I wrote for the SceneKit tutorial some years ago. So, the pitch for the game looks like this:
You have to fly a little airplane through rings
When you pass a ring, it gives you points
You win after you pass all the rings in a given time.
Of course, we can not port these one by one to a spatial device for many reasons:
In VR or classical 3D gaming, we can manipulate the game’s environment. In spatial computing, the environment is given (natural), and we have to create the game in that space (if we do not want to go fully immersive)
Every environment and room is different, which is a challenge when we want to create a game-level
We have a completely different user input. Yes, we can also connect an Xbox controller, but we want to use the possibilities we have on the AVP
These things sometimes end even in the fact that a game or its mechanics do not make sense in spatial computing. For our game idea, there is an approach that may still be fun if we do it right, but for this, we slightly change the game’s logic and even its mechanics.
We will create the game so that the user first places the rings in the room and flies after a little airplane through them in a given order. So let’s start implementing…
Place Rings in Space
This will be our first challenge in spatial computing. How can we place the rings in the room, and how can we even select the position in the space where we want to place the ring? We have several possibilities:
Place the ring where the user stands (at device position)
Look at any position, make the pinch gesture, and place it there
Place it relative to room elements (like windows, walls, etc.)
Scan the environment and select a place in the scanned environment
Use hand tracking and gestures
All of them are more challenging to implement than it first seems, but I will cover them all during the newsletter series.
But at first, we start with a simple one: Solution #1
Head Anchors
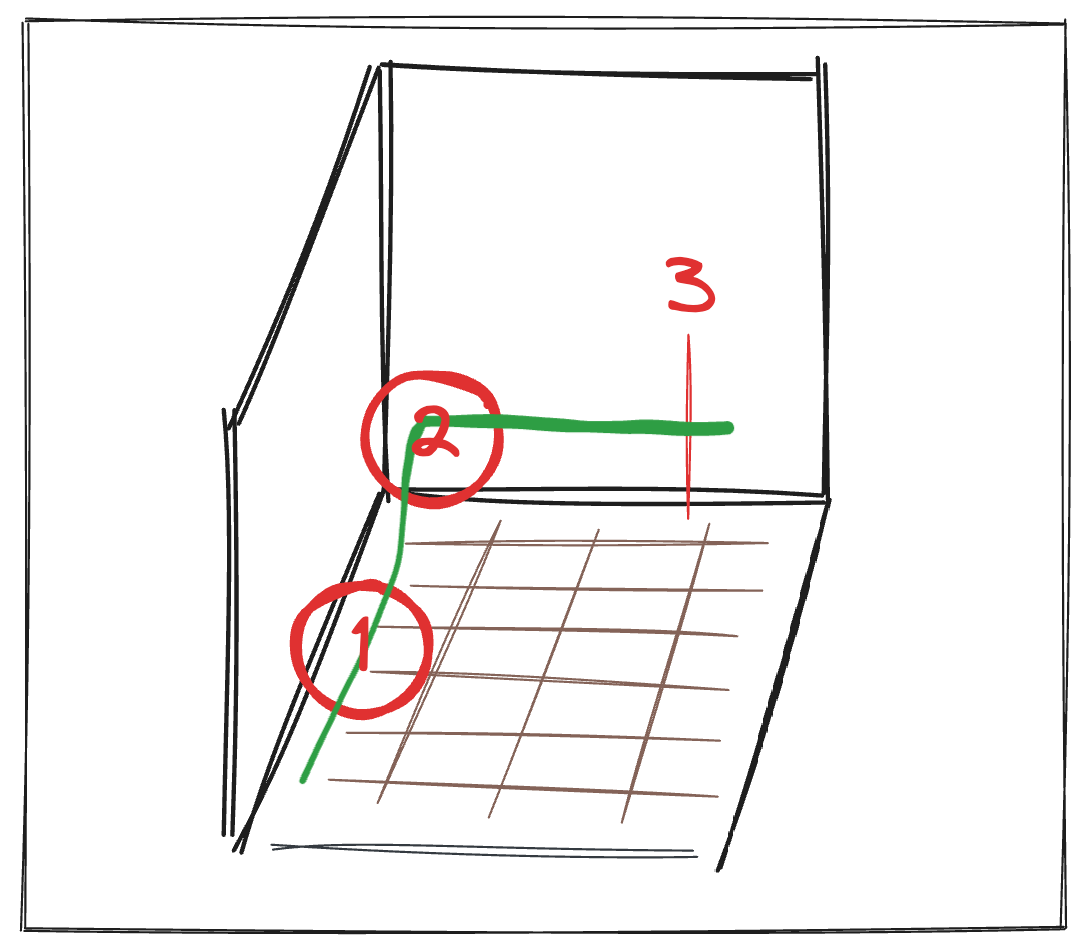
Getting the devices positioned in space is simple and will show you later, even a class that does that all by itself. But how do we confirm the position in which to place the ring? Also, we have many possibilities for this, but we use a simpler one at first: Anchors. RealityKit (as ARKit) uses the concept of anchors. They control how RealityKit places virtual objects into your scene.
RealityView { content, attachments in
if let scene = try? await Entity(named: "Immersive", in:
realityKitContentBundle) {
content.add(scene)
// 1. Add a head anchor to the content
ringAnchor = AnchorEntity(.head)
ringAnchor?.position = [0, 0, -1]
content.add(ringAnchor!)
// 2. Add a little box, so we can see the position
let box = MeshResource.generateBox(size: 0.03)
let material = SimpleMaterial(color: UIColor.red, isMetallic: true)
let boxEntity = ModelEntity(mesh: box, materials: [material])
ringAnchor?.addChild(boxEntity)
guard let attachment = attachments.entity(for: "ring_attachment")
else { return }
attachment.position = SIMD3<Float>(0, -0.05, 0)
ringAnchor?.addChild(attachment)
}
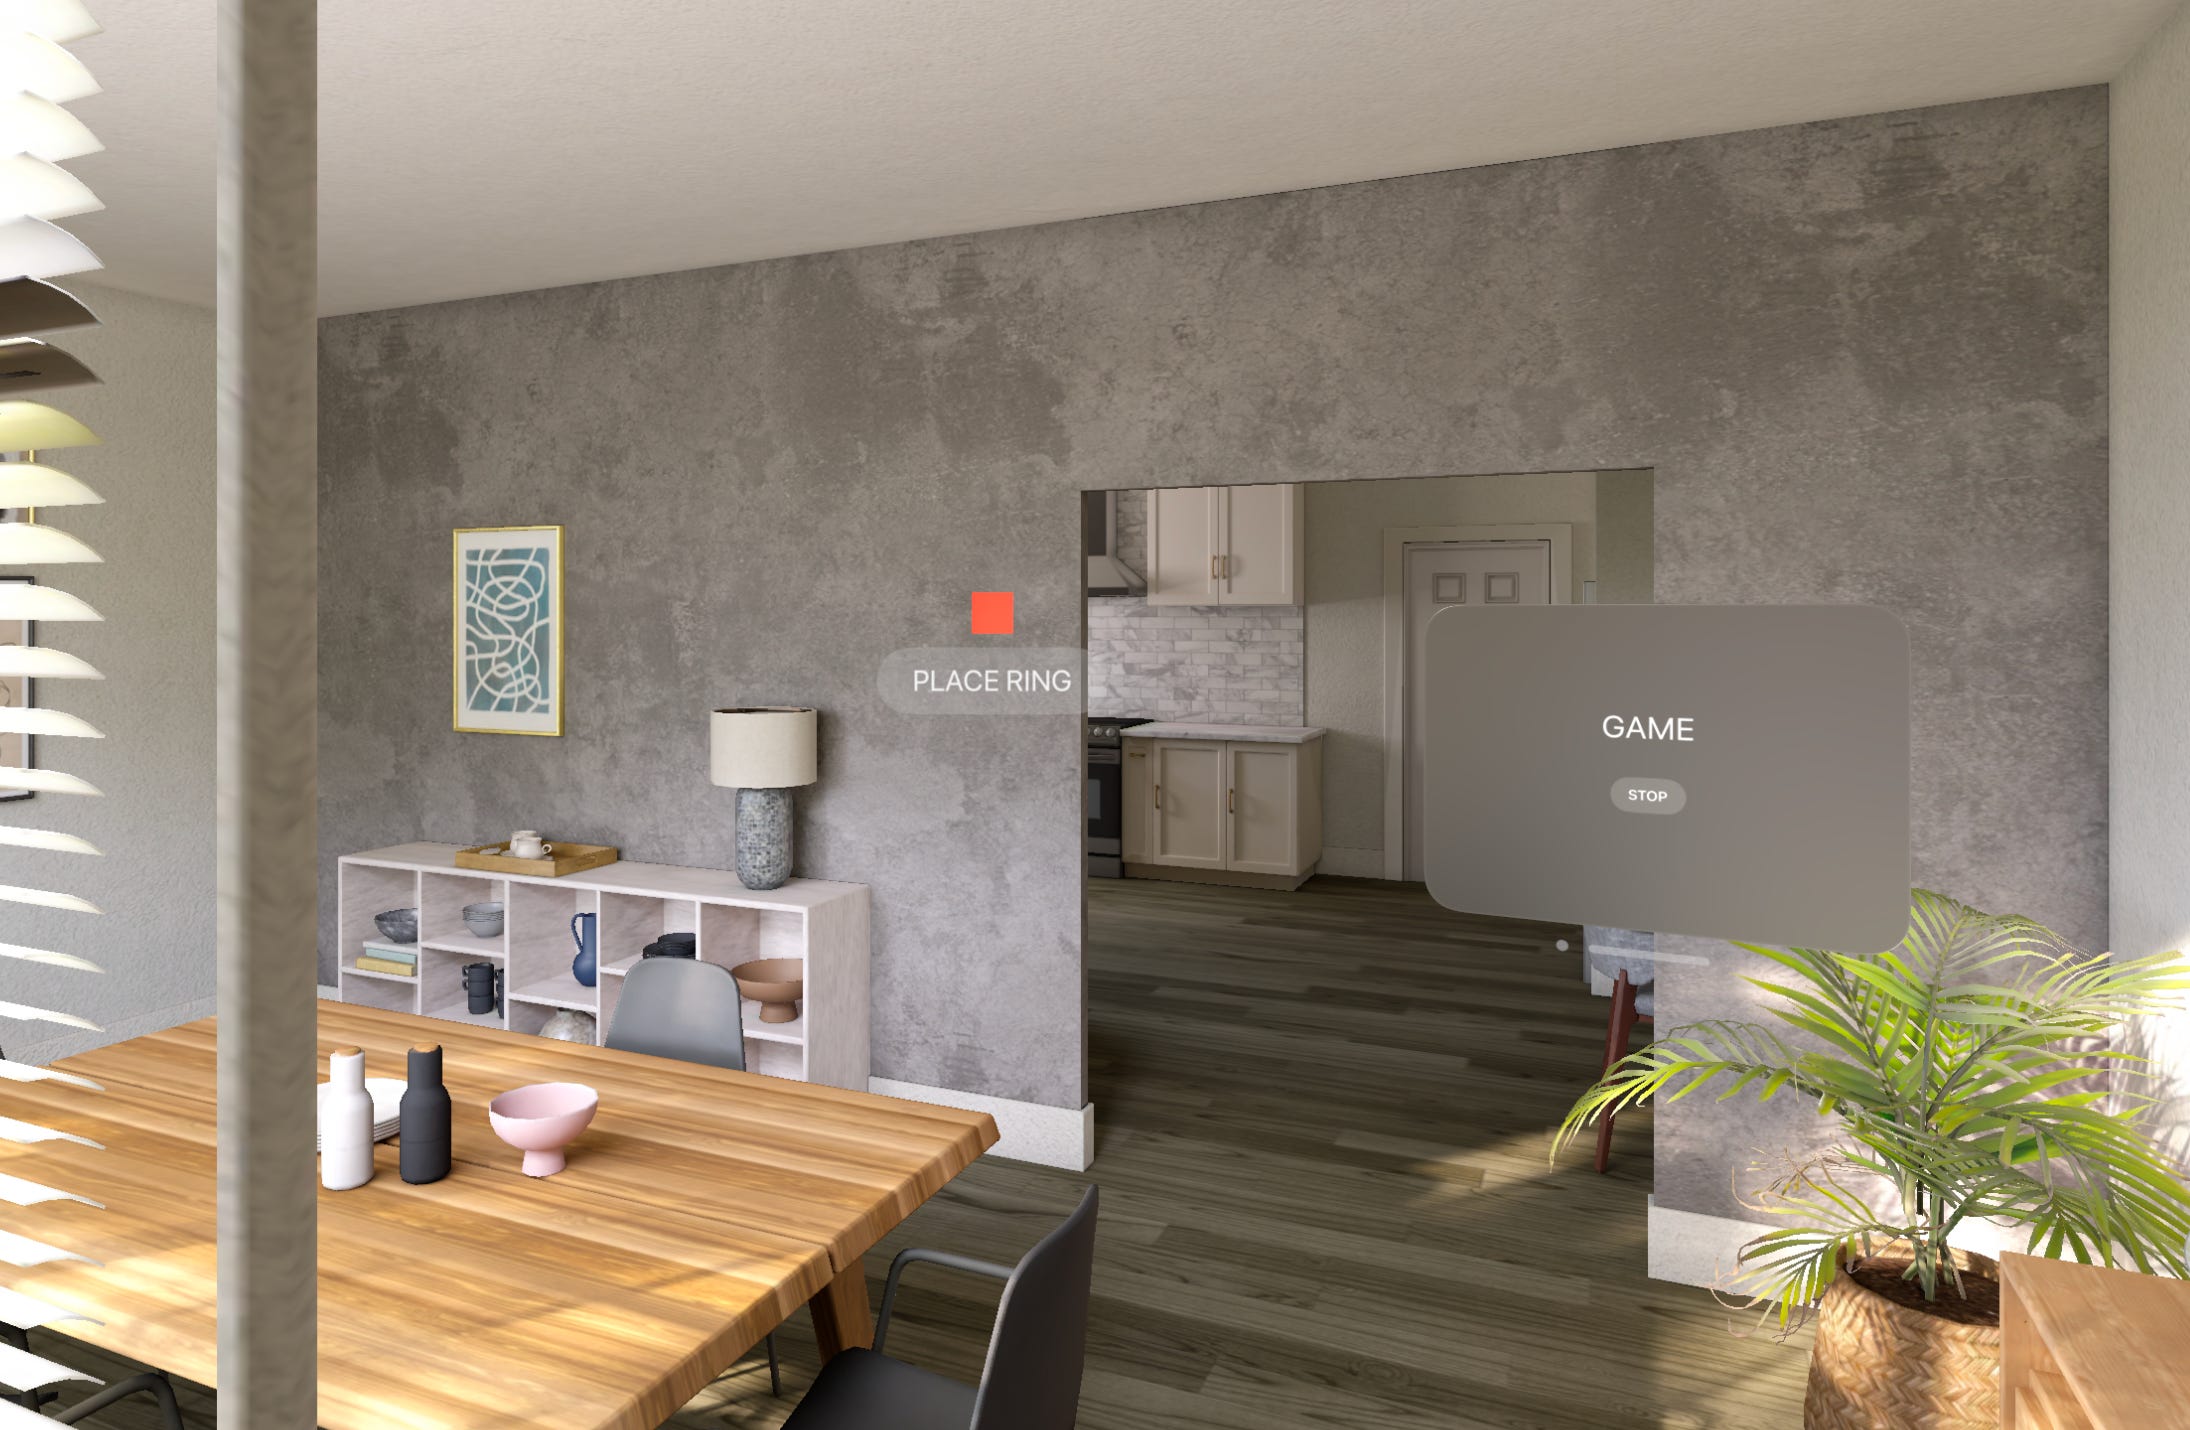
} Attachments
So now we know how to display the position, but still, how does the user confirm that he wants to place the ring there? I will attach a Swift UI view to the head anchor. It contains a small button showing the user's action to place the anchor. I know this is not very sophisticated; you won't see all the fancy stuff like hand tracking, but let's keep it simple and learn other essential concepts, like attachments, along the way. With the idea of attachments, we can add any SwiftUI view to a 3D object in our space. Let’s see how this works:
RealityView { content, attachments in
    // See above
}
attachments: {
    Attachment(id: "ring_attachment") {
        Button(action: {
            // ... add action here
        }) {
            Text("PLACE RING")
                .font(.largeTitle)
                .fontWeight(.regular)
                .padding()
                .cornerRadius(8)
        }
        .padding()
        .buttonStyle(.bordered)
    }
}
The only changes we have to make to use the attachments you see above. Everything inside Attachment(id: "ring_attachment") is regular SwiftUI code. You can have as many attachments as you want; just give them different ID’s.
Also, remember to add the variables it needs, but you can see them in the final code.
What’s next?
That’s it for now, but we will extend this game step by step and use many more of the impressive features available in visionOS.
In the following article, I will continue placing the rings and make some fixes related to head movement. Also, we will see soon how to add the little airplane and how we can fly it. Stay tuned until next time!
The source code for this tutorial you find on GitHub

Please also consider to subscribe on my YouTube channel where I post more stuff related to the Apple Vision Pro, but also about an upcoming game for visionOS im working on.