
visionOS - From Zero To Hero #4
#visionos #visionpro #apple #game #tutorial

Game Programming Design Patterns
Soon, we can continue our journey with a comprehensive understanding of the game logic and the platform specifics of a visionOS App. But before we embark on this adventure, let's equip ourselves with some fundamental concepts that are the building blocks of every game. These concepts hold immense importance and empower us to write games with versatility, making changes and improvements a breeze during development.
Game Controller
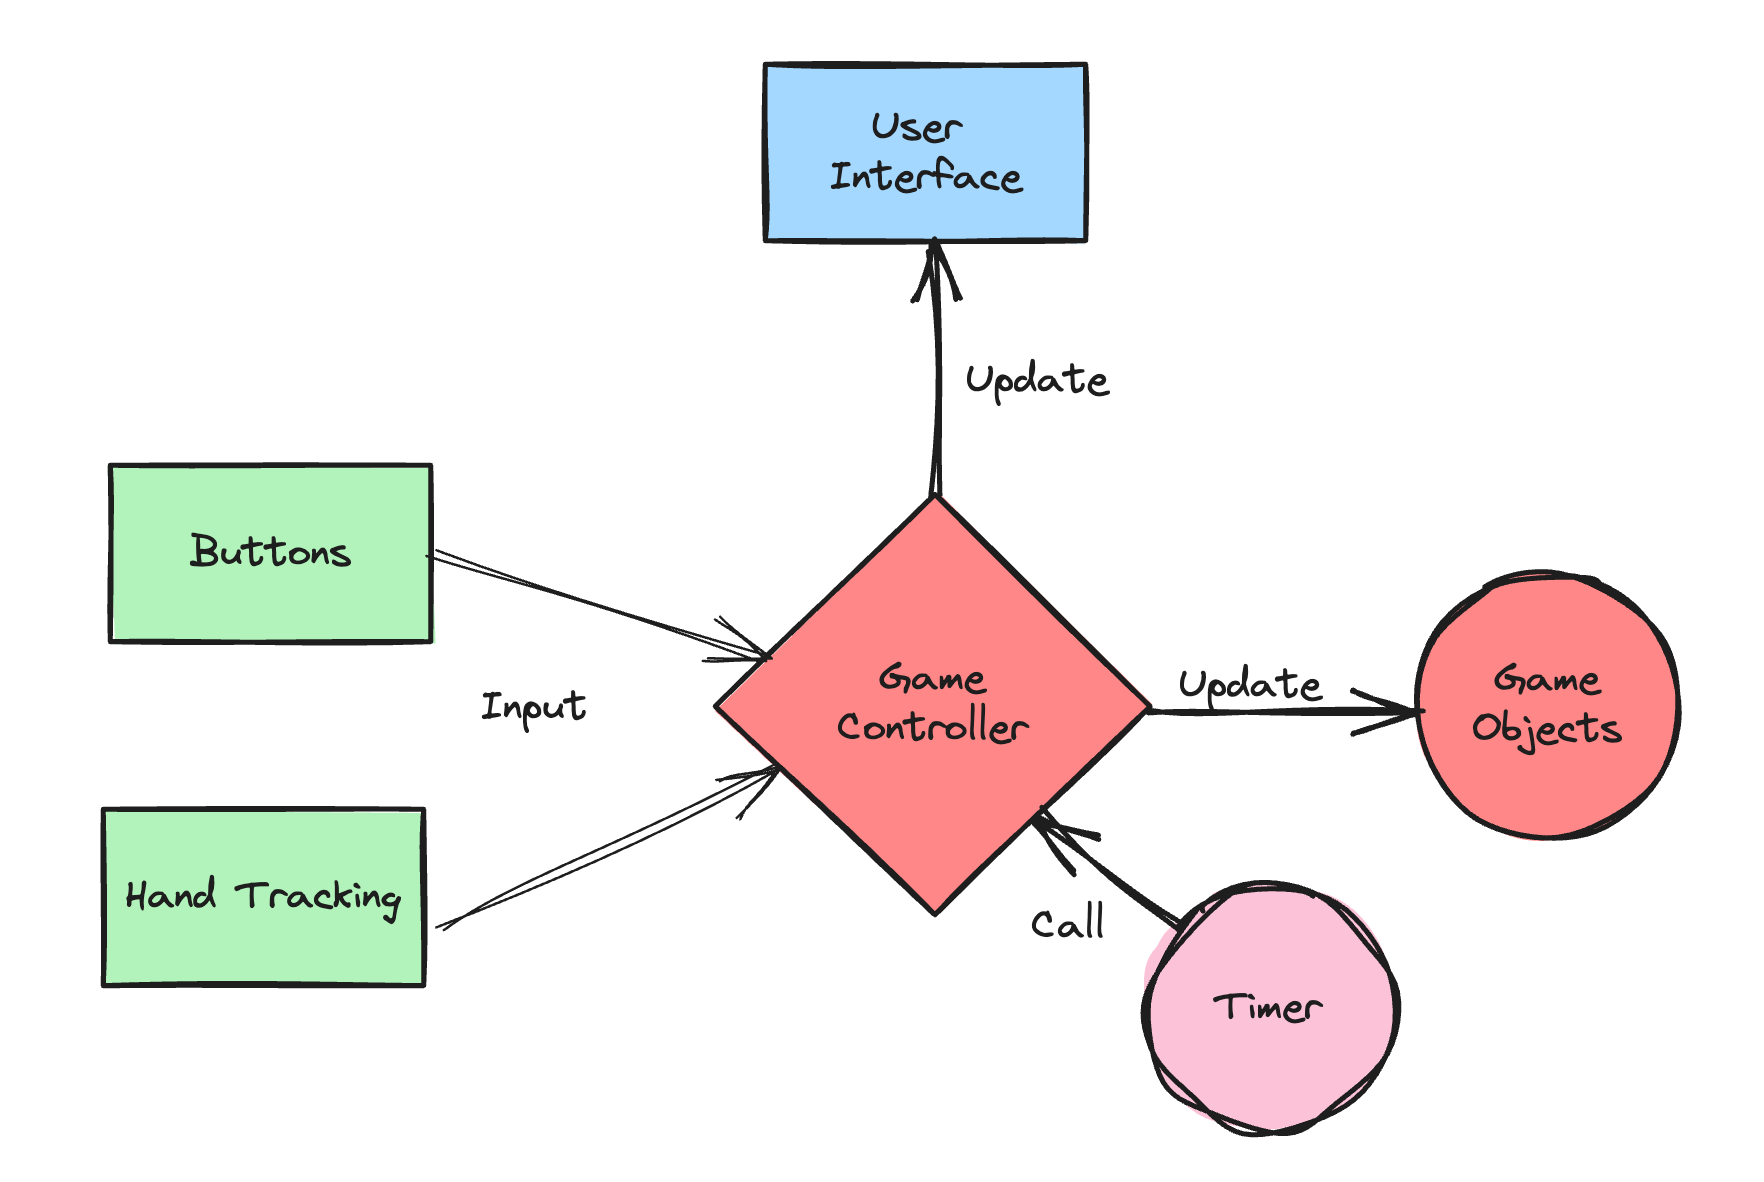
The Game Controller design pattern is a game development powerhouse. It is a central hub for handling all requests, ensuring efficient management. This pattern is similar to the widely used MVC pattern in various programming languages, underlining its importance in game development.
Here, I use the Game Controller mainly to handle user input and manage the game objects (see below).
Game Objects
Imagine handling the airplane more straightforwardly, directly calling the Entity class behind it. However, with a game object class, we can add general functionality that applies to every game object. This becomes especially useful when we add more game objects to the game. Even now, we can separate the implementation details and use more general functions from outside, like airplane.fly() or airplane.turnLeft(), hiding all the complex mathematics inside. This approach is not only more efficient, but it also allows us to reuse these functions for any game object.
Game Loop
Traditionally, every game works more or less in the same way.
Handle user input
Update graphics
Go back to 1)
This has to happen very fast to get a realistic impression, between 30 and 60 times per second. This speed is also called a game's frame rate: how many times this loop can happen per second. It is also important to keep that frame rate as constant as possible so the user gets the impression of seamless movement.
The approach I will show here first is the usage of a timer. This works perfectly for our approach but has one main disadvantage: Whenever the user does some user interaction, like pressing a button or moving a window, the timer pauses. But for now, we live with that disadvantage, and I will show later some better concepts for implementing the game loop.
Mathematics
For some aspiring game programmers, this is sometimes one of the most challenging topics in game programming: Mathematics. But if you have ever wondered why you learned that in school, here is the answer and, in my opinion, one of the best reasons ever to understand mathematics: Create cool games :)
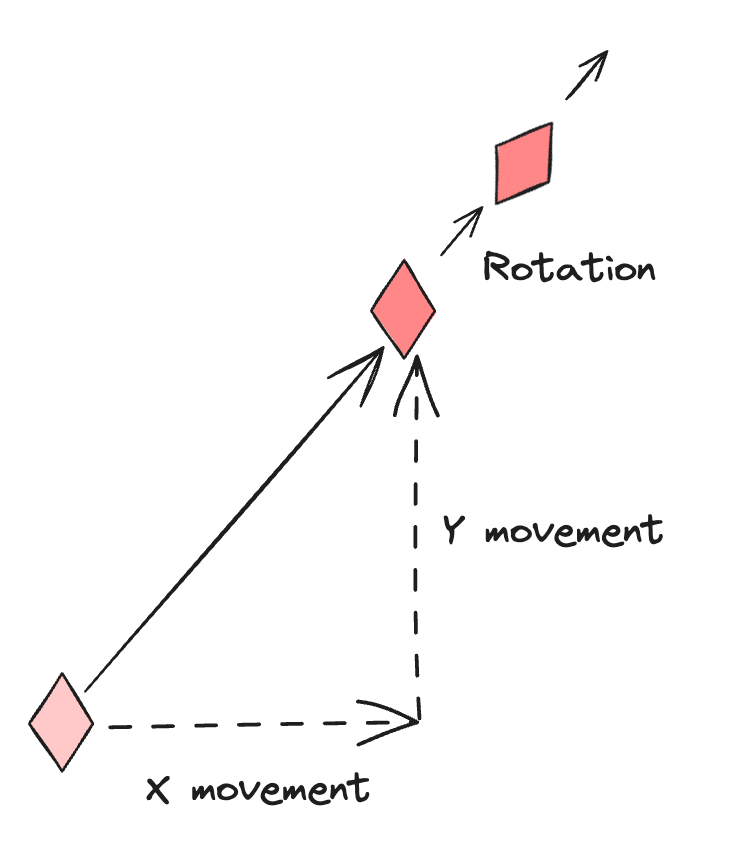
But no worries, we start very simple. For now, we need functions for which we need a bit of 2D mathematics. We need to calculate the distance in the x and z direction the airplane must fly when we give a specific angle.
let dx = cos(RBMath.degreesToRadians(_angle))  // 1
let dy = sin(RBMath.degreesToRadians(_angle))  // 2

let speedX = _velocity * deltaTime             // 3
let speedY = _velocity * deltaTime
self.position.x += speedX * dx                 // 4
self.position.z += speedY * dy                 // 5
First, we calculate the movement in the x direction by using the cosine of the angle we want to fly
The same we do for the y direction by using the sine of the angle
Next, we calculate the speed in the x and y directions. This is only the velocity we have set, multiplied by the time we last time calculated this. For that, we generate a constant speed (see game loop)
Now we have to update the current x position with the distance we calculated before
The same happens for the Z direction (If you are confused about why I use the y value for the Z position. This is just because the calculation is in 2D, and we want to use that for horizontal movements, which are X and Z in our 3D system)
That’s it, and in the future, you can use airplane.turnLeft() or airplane.turnRight(), and RBGameObject do all this for you!
The only thing that remains is to align the game object so it looks in the direction it moves. Would look curious otherwise ;)
The Game
After all this basic stuff, let’s go back to the game itself
Game States
We have already discussed different game states in part two of this series. While we have used this before to handle the placing of the game elements, we now use the same game states to handle the game.
For this, I added the function changeTo() to the GameController, so the application just passes the game state, and the game controller knows how to handle it. The most important is GameState.play, obviously, because it starts the game.
At the same time, I’ve added another concept for passing information between classes: callbacks. GameSpace registered itself with the following lines of code at the game controller to get notified whenever the game state changes.
GameController.instance.onStateChanged = { (oldState, newState) in
... Do something here
}
Of course, you can also do that by using SwiftUI concepts, but if we want to use the same outside of SwiftUI (ex., game logic), this is very helpful.
Keep in mind that this tutorial is not about creating production-ready code but rather about giving you different ideas on how to implement your game.
Start the game
You have now all the information on how to start the game and let the airplane fly, but I also will explain shortly the code that implements the concepts discussed above.
private func start() {
  guard let airplane = self.airplane else { return }   // 1

  airplane.fly()                                       // 2

  let interval: TimeInterval = 1.0/60.0                // 3
  Timer.scheduledTimer(withTimeInterval:interval,      // 4
                       repeats: true) { timer in
    if !self.update(deltaTime: Float(interval)) {      // 5
      timer.invalidate()                               // 6
      return
    }
  }
}
First, we check if the Game Controller has access to the airplane
Then we let the airplane fly (This sets internally the velocity to a value other than zero)
We calculate the milliseconds we have to update the game objects: 60 FPS is equal to 16,666666 milliseconds
We start a timer
As long
update()returns true the timer gets calledIf
update()returns false, we stop the timer
The update function is very simple and checks the current game state and calls the update function of the airplane
private func update(deltaTime: Float) -> Bool {
  if gameState != .play {
    rbDebug("Stop game. Game state is '\(gameState)'")

    return false
  }

  airplane?.update(deltaTime: deltaTime)
  return true
}
Change Directions
After implementing how we start the game, we need two additional functions to turn the airplane either left or right. Since we have already discussed the mathematics behind it. These functions are now very easy to implement
func turnLeft() {
  guard let airplane = self.airplane else { return }

  let angle = airplane.angle - 90.0                    // 1
  airplane.changeDirectionTo(angle: angle)             // 2
 }

func turnRight() {
  guard let airplane = self.airplane else { return }

  let angle = airplane.angle + 90.0                    // 1
  airplane.changeDirectionTo(angle: angle)             // 2
}
To change direction in one or the other direction, we increase or decrease the angle by 90 degrees
We pass this new angle to the game object by calling changeDirectionTo(angle: angle). As you can see, this function also changes the angle internally, so we could also use airplane.angle = angle. I packed that in a function because we later also want an animation, so it’s good practice to add a function for it.
User Input
Since this tutorial is about game programming for visionOS, we also want to use dedicated technologies on this platform. For now, I only have buttons to control the game. For now, even turning the airplane to the left or right is done by buttons.
Of course, we will use hand tracking for this, but because this needs a whole chapter by itself, I have moved that to the next newsletter.
Sidenote: I also do this very often for my own games. I place some buttons in the UI during development to debug the game more quickly. Of course, I disable them in the final game.
What’s next?
In the following newsletter, I will discuss hand tracking and the different possibilities visionOS gives us to use it to control our game. Stay tuned!
The source code for this tutorial is on GitHub

Please also consider subscribing to my YouTube channel, where I post more stuff related to the Apple Vision Pro and an upcoming game for visionOS I'm working on.